Just Orffin’ Around Halloween Music – If I Were a Little Ghost

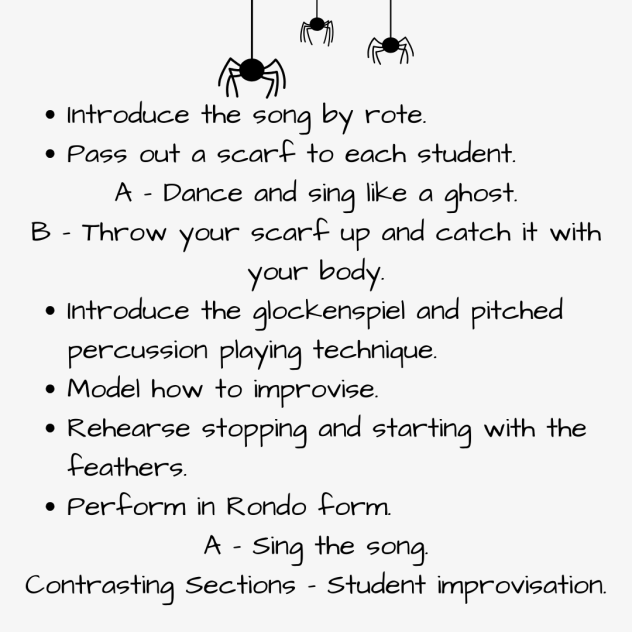
I love this time of year in the music classroom. Halloween songs and poems are exciting for K to 3 learners. (And me, too.) I will do a weekly series in October sharing what I am doing in the classroom.

I rediscovered Wee Sing Halloween several years ago and loved some of their little tunes. A favourite in my classroom is “If I Were a Little Ghost.” By the end of this experience, students will:

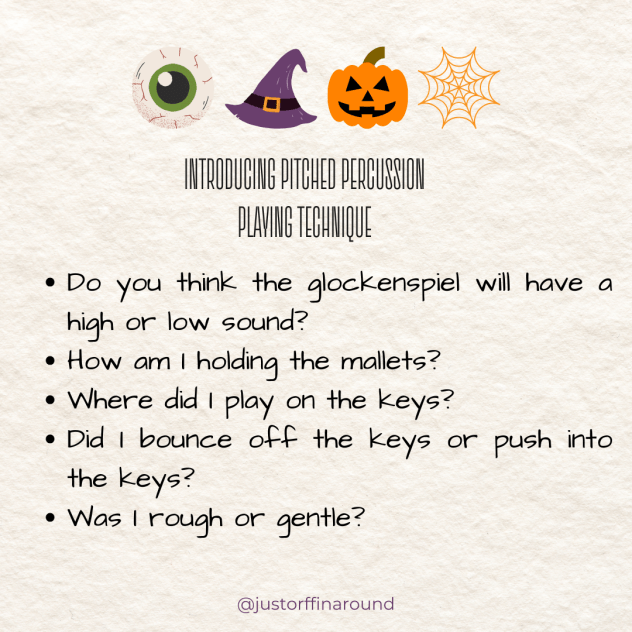
  • Label the glockenspiel.
  • Identify that it has a high sound.
  • Hold the mallets like handlebars of a bike.
  • Bounce off the keys gently.
  • Play in the middle of the keys.
  • Improvise a short melodic fragment.

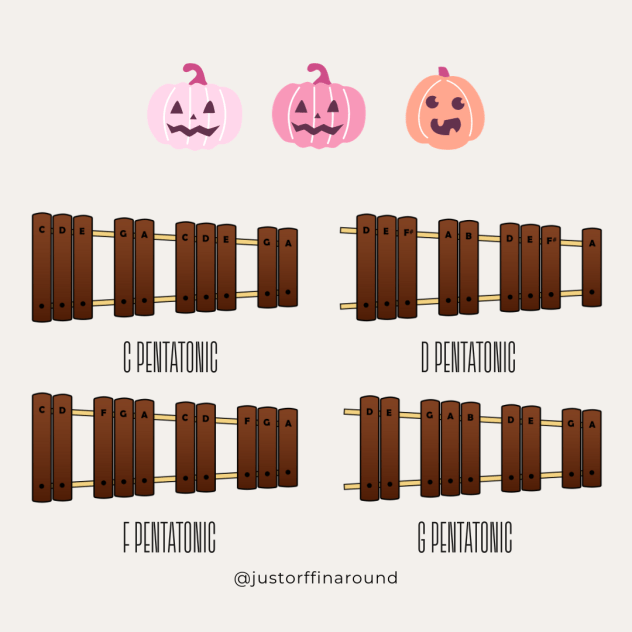
It uses a simple I-V accompaniment that the teacher can play as the students sing. I use it for glockenspiel improvisation as a B section. You can do this in 4 possible keys that fit with a pentatonic scale – C, D, F, G. I tend to do it in D with my littles because some are still finding their singing voices. D is a comfortable key to sing accurately at a young age. The keys of F and G work well with older singers who have expanded into their head voice.

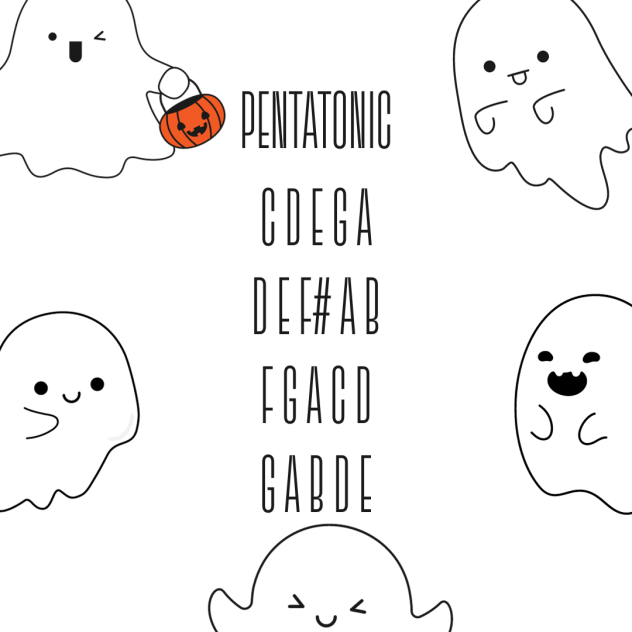
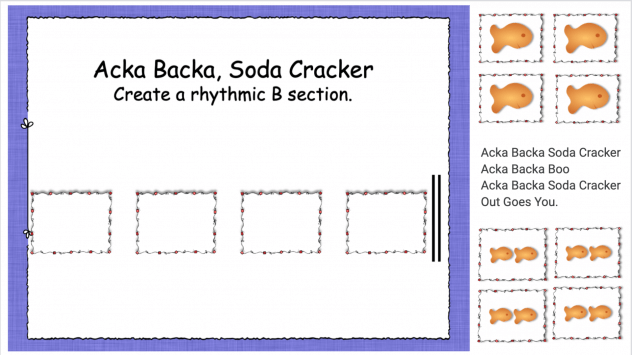
Pentatonic scales are excellent for young improvisation. They can make their “ghosty” music for the B section by playing any note within the specific tone set. Take off the bars on the glockenspiels that don’t fit and let them play.

Teaching pitched percussion technique starts in kindergarten. Our focus is  on:

  • Identifying a Glockenspiel
  • Identifying it has a high sound
  • Introducing Mallets
  • How to hold the mallets
  • Bouncing off the keys gently
  • Playing in the middle of the keys.

Instead of telling them all this, I ask questions to lead them to the answer.

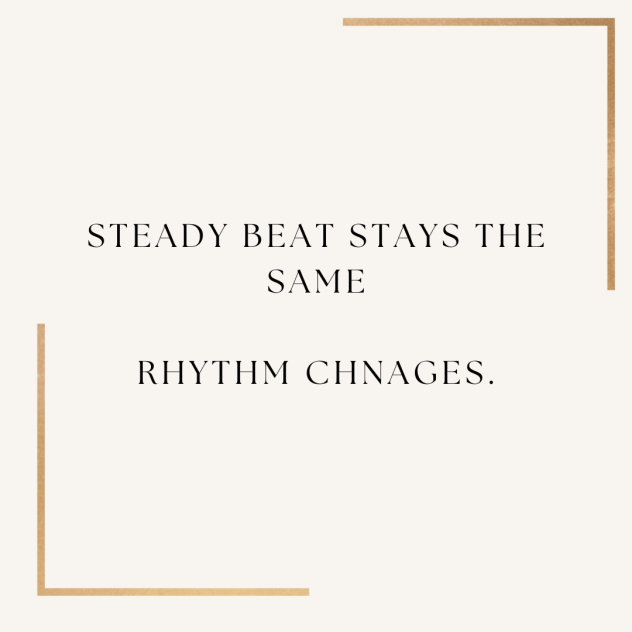
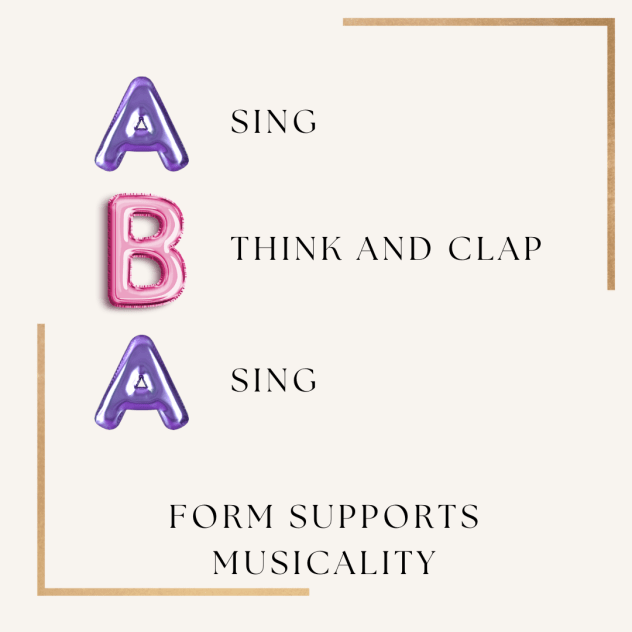
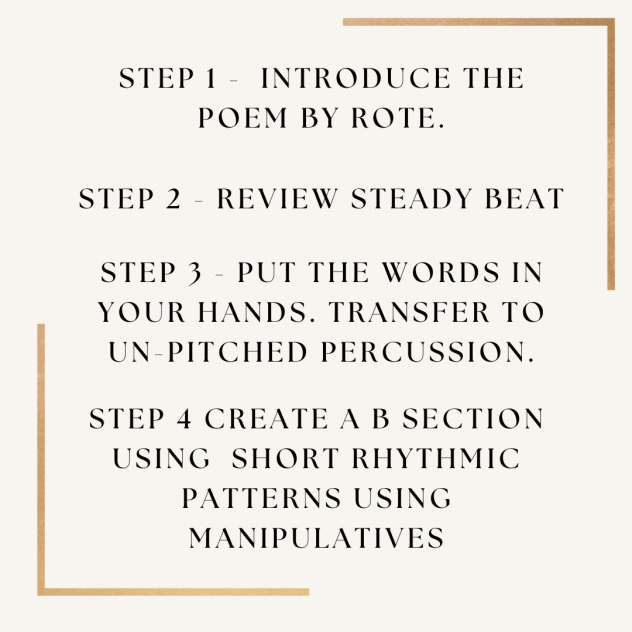
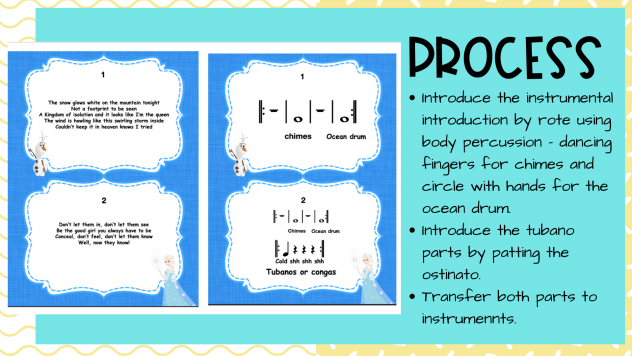
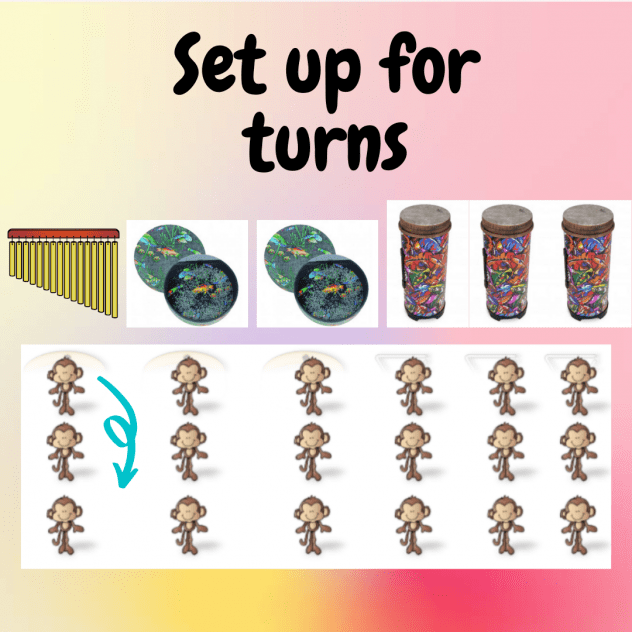
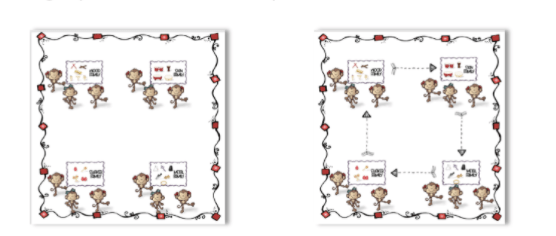
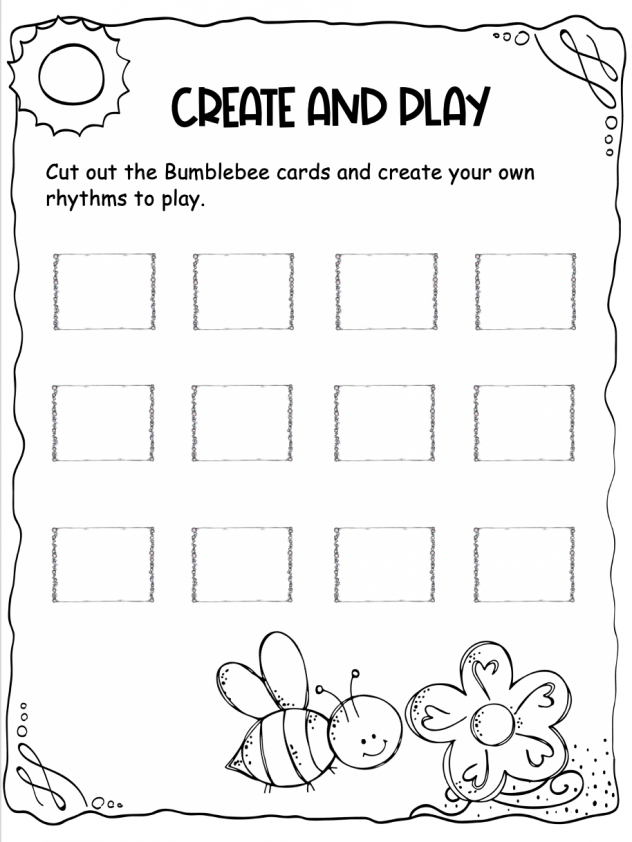
I use feathers as a prop to support the length of the improvisation. When the feathers are in the air, students play. When the feathers touch the ground, they stop. We continue in ABA form until everyone has had a turn. I use the following setup to facilitate turn-taking musically.

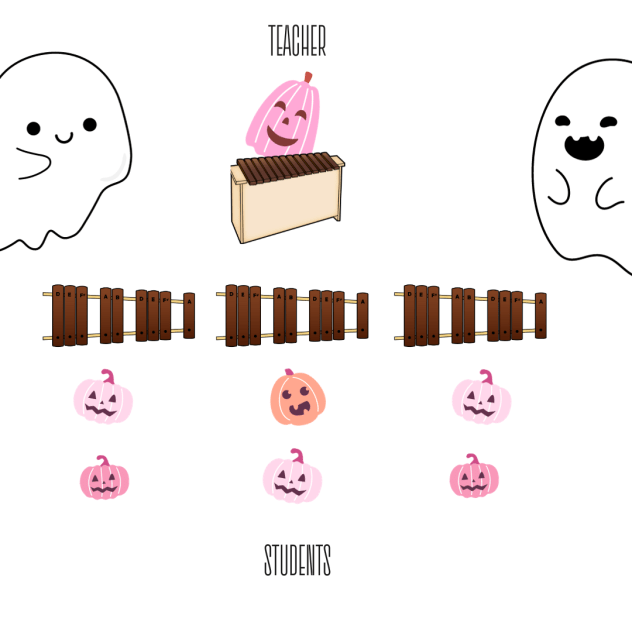
Once the student has had their turn, they go to the end of the line. The class sings the A section as the next kid prepares to play.

Improvisation is one pathway to take with this song, but you can also explore movement. Scarves are very ghostlike. Students move as they sing. When the song ends, the teacher plays a spooky tremolo and calls out a body part for the ghost to land on. Students throw their scarves in the air and try to catch it with their:

  • knee
  • head
  • arm
  • elbow
  • back
  • bum

I like to bring the two learning experiences together – 1/2 the class improvises and 1/2 the class on ghosty movement.

So to lay out the process:

Click the link below for the teacher accompaniment of “If I Were a Little Ghost,” I hope your classes enjoy it as much as mine. Please let me know how it goes in the comments. I always love getting feedback.

If I Were a Little Ghost Teacher Accompaniment.

Check out some other Halloween fun on my TpT store by clicking the links below.

Take care,

Ms. Syndi

Cobbler Cobbler – Focus on Rhythm for Kindergarten

I love the possibilities with the song/poem “Cobbler Cobbler.” It is incredibly versatile and perfect for K to 3 music instruction. My littles in kindergarten will be experiencing this classic over the next few days.

Step 1 Introduce the poem by rote.

Teaching by rote is the most efficient way to introduce a poem or song. Some pedagogues feel it takes away from learning to read music; however, at the K to 3 level, the rhythmic or melodic reading skills are more meaningful when students can connect it to prior knowledge—in this case, being able to sing the song accurately.

I use a four-step process when teaching by rote. The students understand the process and can define each level.

Level 1 – Begin with short phrases.

Level 2 – Listen Longer.

Level 3 – Listen to the entire song.

Level 4 – Sing with the teacher.

Does it drive you crazy when students sing when they are supposed to be listening? My cone puppet, “Westy,” the mouse, helps support proper echoing technique. Listen when the puppet is in the cone; when the puppet is out, sing. My students love it, and it is always in my hands when teaching a song or poem by rote.

Step 2 – Review steady beat

Understanding the difference between a steady beat and rhythm is a core concept that must be reinforced yearly. I use a simple definition. The steady beat stays the same, and the rhythm changes. Rhythm includes both short sounds, long sounds and silence. After learning the poem by rote, we feel the steady beat in our bodies. I begin by patting the steady beat. I ask the students: “Is this a steady beat, or is it rhythm? If they answer incorrectly, I ask, “Does it stay the same or change?”

After re-defining the steady beat, I asked the students: “Where in our bodies can we keep the steady beat?” Using their suggestions, we feel it in different ways before transferring it to un-pitched percussion.

Step 3 – Put the words in your hands. Transfer to un-pitched percussion.

Rhythm = words in kindergarten music. Rhythm should connect to language. The kindergarten teachers love how I introduce this concept because it correlates to their work with syllables. Another link to the classroom is through audiation. Audiation is internalizing sound. When we think and clap the words, we develop the skill to read silently, process, and problem-solve internally.

I use form to maintain the musical integrity and flow of the experience. The students will sing the song; Think and clap the rhythm; And then sing the song once again.

Properly understanding a concept is demonstrated when you can use prior knowledge in a new way. If you read my last post, I ask questions to support the Creative Process. How can we perform the rhythm in a new way? Students will offer suggestions like patting the rhythm, snapping the rhythm, and stomping the rhythm. I want to transfer it to instruments, so I have the instruments visible for inspiration.

I had the different un-pitched percussion families playing individual phrases in this arrangement. Because it is the beginning of the year, I will have all the instruments play the rhythm together. Our form will now include: “Think and play” instead of ” Think and clap.” I will play the bordun to accompany the students to pull it all together. Orff arrangements are adaptable to fit the needs of your students.

Step 4 Create a B section using  short rhythmic patterns using manipulatives

The students will work in small groups for this part of our lesson. Create a four-beat pattern using “cobbler” for two sounds and “shoe” for one sound.

Before they begin this assessment activity, I model how to take turns and resolve conflict. I encourage students to maintain the form by singing the song as one student creates. As they play together, I circulate and assess whether they can accurately clap one sound and two sounds. The students don’t even know they are being evaluated.

To recap the process:

As always, I like to share with my community. Here is a link to my ‘Cobbler Cobbler – Focus on Rhythm” E-Book:

Have fun and let me know how it goes for you.

Take care

Ms. Syndi


Let’s Play – Supporting the Creative Process in Music Class

I’m back. It has been a while. Last year, I switched schools after teaching at Westwood Primary for ten years. Change is necessary for growth, but it was not an easy year. Less time was available for blogging and sharing, but I am hopeful to get back into it now that I am in year 2. Today, I am thinking aloud about using “Let’s Play” by Herve Tullet to support my students in making creative choices.

The Creative Process as a Pedagogy approach fits well with my Orff specialist background. You can Google the Creative Process and find multiple ways to follow the steps in your creativity, but how do we support students in their journey? It begins with questions.

I work with pre-service teachers as a sessional lecturer and mentor, and the first habit I have to break consistently is the teacher-centred, tell-the-kids-the-answer instinct in all young teachers. Yes, we do have to share knowledge and skills with our students, but sparking the students’ creative process by asking questions instead of telling them what to do makes the learning more profound and meaningful. Let’s work through the process with “Let’s Play!” We need to begin with an objective and an assessment statement for my kindergarten class. Keep in mind that your objective and assessment needs to match.

This year, I want to connect my lessons with books. As a veteran teacher, I challenge myself to try new things within the Orff umbrella each year. It drives my husband crazy that I don’t plug and play the same resources, but that would be boring!

This book is perfect for vocal exploration with the line pathways and dots. When I read it to the students, I follow the lines with my voice as I trace them and make vocal sounds for the dots. I model what I want them to choose to do with the book. You may consider this cheating, but I look at it as inspiration.

I ask students to share their favourite page but want them to follow up by discussing the art. I use questions to guide their noticing, beginning with broad questions and shaping them if needed.

Why did you like this page?
Did you like the lines?
What was unique about the lines on this page?
Did they go high and low or stay straight?
Did they wiggle?
Did you like the dots?
What was special about the dots?
Did you notice the different colours?

How could we perform this story musically?

With my kindergarten students, this question will stun them into silence. When no suggestions are available to work with, I use “Would” and “Could” questions to offer ideas. Remember, questions spark the Creative Process.

Could we follow the lines and dots with our voices?

Would it work if we all did this together?

The above steps will form the initial experience, finishing with the question: “What did we do with our voices today? Did we find higher places with our voices? Did we find lower places with our voice?” Now, the fun begins. To show true understanding, students must use what they have learned to create something new. Let’s start with sparking some movement ideas. Just like I inspired my students’ creativity with my first reading of the book, I will encourage their creative movement by having movement props in front of the room when they enter the classroom. With this book, I am leaning toward streamers or scarves, but you can use whatever you have.

If you are met with silence…

Could we use a movement prop?
Would scarves or streamers work?
Which one would you like to use?
How can we move when we are touching specific colours?
Can you show me how you will move for the lines? For the dots?

Making the connection: “Wow! Did you notice our movement matched what our voices were doing with the story?”

Day 2 is done. Most of my lessons are pulled over three days. The fluency of a class is essential, and doing too much or too little upsets the flow. You should revisit your process if you need more time to make your teaching point within the three-lesson time frame. The format of my lesson plans includes other activities to fill the 30 minutes.

I want the students to continue to represent the lines vocally so my question is specifically about the dots. To inspire the students, I have the four non-pitched percussion families out and visible. This story works well with pitched percussion as well, however, during the first few kindergarten classes, my focus is on non-pitched percussion.

What instrument family could we use for the yellow? red?blue?

Let’s check our assessment statements.

I can expand my vocal range by following a vocal pathway.

I can show my vocal pathway in a new way through movement and instrument playing technique.

We achieved our objectives since we can answer yes to these I can statements. I did not “tell” my students anything in the process. The more you use this approach, your students will begin to ask themselves these questions, and their creative choices will become more authentically theirs.

Let me know if this lesson works for you. Part of blogging is connecting with other music teachers. I love to hear your thoughts.

Take care,

Ms. Syndi

This week at Westwood Grade 2 – April 5/2021

Do you ever get new instruments you just want to play with? Chances are your students would like to play with them too.😊We received a class set of spoons this week. It could be my Atlantic Canadian roots but I LOVE SPOONS. They are so satisfying to play and have a lovely wooden tone. Sooo…. my grade 2’s are delving into Frozen’s “Let it Go” this week.

When I introduce the beginning instrumental parts, I use body percussion. It transfers easily. I repeat the introduction until everyone gets a turn. If you don’t have the same instruments as outlined above, substitute with found sounds, vocal sounds, rainsticks, anything on hand. I don’t give them a turn at everything, they get a turn at something. The next time we run it, I set the instruments up so they get a turn at something new. Eventually, they will have had a turn at it all.

My students love learning the spoons patterns. The trickiest part is teaching them to control how many times they tap the spoons between their legs and hand. The text associated with the patterns helps keep it rhythmic.

A tubano is a kid sized conga. The open bottom on the tubano allows the tone to project and the students don’t have to hold them up like a conga. They are super cost effective and you can introduce the idea of Bass (“Keep”) and tone (“It steady”). The bass is played in the center of the drum and the tone is played around the edge – where you would see the numbers on a clock.

Putting it all together. I will spend some time running it to this point so the kids get familiar with the form before moving on.

This was the tricky part to orchestrate until I realized using ocean drum and chimes would work just fine. And for a little fun, I added a fill for the kids to play on the tubano. I was recently at a webinar where the presenter discussed counting as microbeats and macrobeats. You need to count this as a slow 4 – macrobeats.

This whole instrumental arrangement is based on 3 spoon patterns, 2 tubano patterns, and 1 idiophone pattern. Super simple but super satisfying. Here is a jamboard with all the visuals you need to try it out for yourself. Have fun! I will post some videos as we move through this process.

Take care,

Ms. Syndi


This week at Westwood – March 28 Grade 1 Updated with some videos.

It has been awhile since I have posted. I am developing a new website which will house the new blog site but it isn’t quite ready yet. However, I miss connecting with all of you so I am going to keep writing and sharing through the growing pains of expanding Just Orffin’ Around.😊

I am sitting and planning my week and I find myself wondering what others doing this week at their schools? What songs, instrument, and movement experiences are being planned for students across our country? Do you wonder the same thing? I thought I would begin a weekly blog entry sharing what I am doing with my kiddos. Let’s take a peek inside music at Westwood Primary for our grad 1’s.

When I plan, I alternate between movement experiences and non-locomotor experiences. I do believe children learn and make sense of their world through movement, so every song or poem I teach has a movement component.

Oh Mr. Sun – Source Gameplan Kindergarten

I love this song for the beginning of spring. You will notice the source is from a kindergarten resource but that’s ok. Remember resources are suggestions. When a song speaks to you, it’s ok to use at other levels. Resources, for me, are a place to find material and then I create my own teaching processes.

Burnie Bee – Source Purposeful Pathways

We have spent a lot of time moving, playing, and reading iconic notation for high and low. Lots of practice and experiences before labeling a concept, makes a meaningful connection for 6 years olds. This week we are going to label so and mi. I found it really frustrating when teachers talked about isolating so and mi without providing context. From the very start, I teach all my students how to sing the diatonic scale using solfege. It provides the context. We sing the scale, then I can say today, we are using so and mi and I remove them from my solfege ladder. The students can see which is high and which is low. Easy connection. I use jamboards like the one below. (If you click on it, you can make a copy😍)

Lock and Keys – Source Wibbleton to Wobbleton

This is a quick fun game to assess pitch matching. It is not a deep learning experience but a tool to do a quick check in.

Jump Frog Jump – Source Gameplan Kindergarten

I try to follow the MISS principal when planning my lessons – Movement, Instruments, Singing, Speech. This little book has an ostinato “Jump Frog Jump”. We will be playing it on non-pitched percussion instruments. I place the 4 families – skins, woods, metals, and shakers in 4 different spots and the students rotate through so they get a chance to play everything.

I will take  some videos of how the process worked and share them with you as the week goes on. Have a Musical Monday,

Take care,

Ms. Syndi

Merry Christmas from Me to You.💕


I started creating resources for music educators because I wanted to share my experience. Since 2016, I have gained followers and I have felt so supported by the elementary music community. At this time of year, I always like to give back with sme freebies. This year I have been using jamboards for creating socially distant B sections. For 4 to 9 year olds, this is using what they know to create something new. My digital Christmas Card gives you access to 5 jamboards I have used with my students successfully. Let’s take a peek.

Acka Backa – Kindergarten 

Beginner rhythmic reading at the kindergarten level uses language rather than conventional note reading. My kiddos would use the word LONG for the big fish and SHORT SHORT for the little fish.

Process

  • Introduce the poem/song by rote.
  • Choose a student volunteer to create a B section by moving visuals onto the empty beats while you recite the poem.
  • Say/Play the rhythm as a contrasting section. To make the B section longer, repeat the pattern.
  • Continue playing with new volunteers.

Star Light – Grade 3

I use this jamboard after introducing Star Light to my beginner recorder players. It helps solidify their note reading skills and they begin to see themselves as creators. You will note I did not add rhythm. We are focusing on melodic contour using G and E on this particular jamboard. Next steps would add rhythm elements.

Process

  • Introduce Star Light through your recorder instruction.
  • Choose a student volunteer to create a B section by creating a melody using G and E
  • Play the rhythm as a contrasting section. To make the B section longer, repeat the pattern.
  • Continue playing with new volunteers.

Bubble Bubble – All grade levels

I fell in love with this poem this year. I use jamboards as a whiteboard to post visuals as well. Finding your singing voice starts with these vocal explorations.

Process

  • Introduce the poem by rote.
  • Choose a student volunteer to create a B section by choosing and tracing a vocal exploration pathway. Students create the pathway with their voices.
  • Continue playing with new volunteers.

Down to the Baker’s Shop – Grade 3

This is a gem I use every year and I usually would have stations set out for my students. They create rhythmic B sections using baked goods. We use it as an introduction, or a coda, or as a contrasting section. It’s a great initial creating activity for the beginning of the year.

Process

  • Introduce the song by rote.
  • Choose a student volunteer to create a B section by moving visuals onto the empty beats while you recite the poem.
  • Say/Play the rhythm as a contrasting section. To make the B section longer, repeat the pattern.
  • Continue playing with new volunteers.

2,4,6,8 – Grade 1 and 2

This worked really well as a review of ta, titi, and rest.

Process

  • Introduce the poem by rote.
  • Choose a student volunteer to create a B section by moving visuals onto the empty beats while you recite the poem.
  • Say/Play the rhythm as a contrasting section. To make the B section longer, repeat the pattern.
  • Continue playing with new volunteers.

I hope you enjoy these little jamboards. When you click the Christmas Card, it will open a presentation view of a google slide. Click each present and you will be directed to make a copy of the jamboards. Voila, some new stuff for January. I hope you all have a safe and happy holidays.

Take care,

Syndi

Teachers Helping Teachers -What I wish I knew when I started teaching Part 1 Classroom Set up.

Didn’t Rod Stewart say it well? I wonder how my first years teaching could have been more effective if someone had sat me down and shared their practical teaching experience with me? I loved my undergrad experience, but, my music education courses were more theoretical than practical. I needed to know how to set up my room, how to use a seating chart to learn names, how to deal with classroom management, how to assess students through stations and games, how to use a creative B section to assess students understanding, how to help young singers to find their singing voice… The list could go on forever.

My mission in creating “Just Orffin’ Around” was to chat, share, and learn together. I have a yearning to share what has worked for me. I want to help my colleagues around the world. In today’s post, I am going to focus on sharing “what I wish I knew” in a four part format : Classroom Setup, Classroom Management, Process teaching, and B sections for Assessment.

And we’re off…

Our discussion is going to be guided by questions that I hope you ask yourself as you set up your room. I don’t want to tell you what to do, but I would like to give you ideas that you can shape and match to your present situation.

Do you really need chairs and desks?

I remember in the summer of 2006, I had a deep thought. (Yes, it was that deep , I remember the year)😍. Why do I need desks and chairs in music class? Music education has evolved. we are no longer sitting in desks reading music from a book. We are singing, playing, moving and creating. We need open space. Since 2006, I have not had desks or chairs in my room and the students love it.

Could stickers on the floor provide students with the same sense of own space?

I was criticized at the time for making this choice. Other teachers felt that the students would all be lying around on the floor and in each others space. The teachers felt a loss of control over their classroom. I was able to keep that sense of own space for my students by placing stickers on the floor. In our school, currently, they are 5 squares apart on every side to provide room for own space movement, and for classroom management. it is the same as a chair but we still have the open space to move when we need it. If they are not sitting properly, I reming them to “Sit like a musician, please?”

Do you see the value in having a large open space for creative movement, folk dancing and singing games?

YES!!!! I wish I had ditched the chairs and desks when I first started. I disliked moving the desks and chairs around to make room for movement. It was a pain in the butt. I also didn’t do as much movement because it was such a hassle to rearrange the furniture.

Would it be helpful to have zones in your classroom for storage?

I have used bins to organize my non-pitched percussion instruments into families – woods, metals, skins, shakers, and idiophones. They are on a shelf and labelled so I can access them easily and put them back easily. (Some of the families have more than one bin. We seem to have an overabundance of claves. Why? I don’t know. 🤷‍♀️ ) My pitched percussion are off the floor when they are not in use, and I have organized my books and scarves inspired by the Home Edit.

Hopefully this post has given you a few ideas on how to get started and make your classroom work for you.

Just Orffin’ Around – Sing, Play, Move, Create

Covid 19 turned our world upside down and inside out. There has been a lot of fear but it also gave us time – time to do the things that matter like:

  • Solve the Rubik’s Cube
  • Learn how to bake bread
  • WRITE A RESOURCE FOR MUSIC EDUCATORS!!!!

It has been a dream of mine to write a book for music teachers. A book with clear process driven content that includes all the necessary visuals and Orff arrangements. A book that is current on best practices in primary music education. A book that unifies K to grade 3 music programs.

When I started creating resources for music educators in 2016, I made a commitment that everything I made would be used in my classroom. Full time teaching is so busy. I couldn’t waste the time creating something I wasn’t going to use. “Just Orffin’ Around – Sing, Play, Move, Create” includes lesson plans, visuals, and Orff arrangements that are indeed “Classroom Tested and Kid Approved“.

Elemental music and Orff schulwerk are based within the elements of music. How we experience these elements can be broken down into seven categories:

  • Let’s Sing
  • Let’s Say
  • Let’s Move
  • Let’s Play (Instruments)
  • Let’s Create
  • Let’s Listen
  • Let’s Read and Write

There are certainly subsets of each of these categories. For example “Let’s Create” could be dramatizing a story. “Let’s Move”could be experiencing a rhythmic pattern through body percussion. In my Orff Journey, the seven categories of experience have worked well for me. In my new book, I focus on 4 of these experience categories – “Let’s Sing”, “Let’s Move”, “Let’s Play” and “Let’s Create”

STAR LIGHT – LET’S SING

Star light is a wonderful repertoire selection to work on vocal development and melodic contour.

Throughout this resource, I spiral the process across k to grade 3. (Same music, Different Achievement Indicators, Developmentally Appropriate Musical Experiences.) I don’t spiral all my instruction but I pick the gems and use them to unify my music classes through cross grade level sharing or performances. It feels like a big, warm, hug when the 4 year olds are making music with the 9 year olds.

In developing the lesson plan, I included experiences, with visuals, that you can use with other songs – like these Vocal Exploration Cards.

And these Melodic Contour Visuals.

And these Melodic Sight Reading Visuals.

I like to use them as a B section to the song.

Acka Backa, Soda Cracker – Let’s Play

Acka Backa is a gem I use every year. It can be used melodically and rhythmically.

After each process, I share classroom set ups, pointers, and pedagogy tools to support these songs and experiences.

Orff arrangements are clear and developmentally appropriate for each grade level.

And for our little recorder players…

One, Two, Three – Let’s Create

Gem number 3.  “One, Two, Three” can be used as a poem or a song. I use it as a poem to support my K’s and 1’s first experiences in arranging and for my 2’s and 3’s, it leads to an experience in composition.

“Let’s Create” is my assessment tool. When students use what they have learned to create something new, they are showing a deep understanding of the new skills and learning.


Here is a little clip of my grade 3’s performing the compositions they created for “One, Two, Three”. They LOVE seeing themselves as composers.

One, Two, Three – Grade 3 Composition


Ice Cream – Let’s Move

This is a little piece I use to explore the ostinato and body percussion levels. Using the ostinati in a little story supports practicing and skill development.


This book was so much fun to write. I hope you take the chance to preview it. All the visuals used in this post are free for you to use and found on my PDF visuals page on the blog. If you are interested in purchasing the book, click the link below.

Click here.

Take care,

Syndi

Using Classical Repertoire to Inspire Creativity – Kindergarten Edition

A primary music class is a very busy place. We are singing, moving, playing games and instruments. I sometimes don’t have time to introduce classical repertoire to my kiddos.  (Classical music is also notoriously long winded for 4 to 9 year-olds.) “The Flight of the Bumblebee” is the perfect length and full of creative possibilities.

The Flight of the Bumblebee – Nikolai Rimski- Koraskov


Sparking creativity in kindergarten is always fun when you add props. Bring on the scarves!!

Creative Movement 

Process

  • Tell a story about watching a little bumblebee flitting from flower to flower. Cross-pollinating so we have healthy food to eat.
  • Give a movement scarf to each student.
  • 1/2 class are flowers. 1/2 class are bees.
  • Bees move from flower to flower. Can they move high? Low? Left? Right?
  • At the sound of the finger cymbals (Teacher or student volounteer), students switch roles.

My K to grade 3 students find this super satisfying. And it is a springboard into some vocal exploration.

Vocal Exploration – Creating bumblebee pathways.

Finding your singing voice. It can come naturally or it can take years. But this is where it starts – breaking free of your talking voice. I tell my students about my Mom. She was labelled a crow because she couldn’t match pitch. She believed she couldn’t sing. I explain to my littles that she just didn’t have the right teacher.

We spend all day talking – our voices don’t go super high and they don’t go super low.

We need to find those higher places and lower places and vocal exploration cards are an amazing tool.

I use the poem “Bumblebee” as an A section and we do the vocal exploration card for the B section. They LOVE this.

Bumblebee, Bumblebee

Stung a man upon his knee

Stung a pig upon his snout

I say you are out

Now to the creativity!!!! I give them this little worksheet and they create their own vocal bumblebee pathway. They can work with a partner and they can perform the ABACA pattern together. (A – Poem; B and C – their vocal explorations)

Process

  • Intro the poem “Bumblebee” by rote.
  • Intro the vocal exploration cards. Trace as students move their voices to match the shape.
  • Perform ABACA.
  • Pass out the pathway worksheets.
  • Students explore their creations with a partner.

Bumblebee Compositions – Rhythm

Composing in kindergarten needs to be scaffolded. I also really enjoy when they collaborate. We begin by exploring rhythms using “Bumble” for 2 sounds and “Bee” for 1 sound.

And yes, I use these 4 beat rhythms as a B section with the poem. I LOVE FORM!!!

Once they are comfortable reading these rhythms, they do group work using the following tools:

In their group of 3, they create a 4 beat rhythm. Then, they can add it to the poem ABACADA. FUN!!!

As always, I have left a PDF of the visuals used in this post on my PDF page at the top of the blog. You can also purchase my new product “All about…”The Flight of the Bumblebee”. Click on the picture below. Let me know what you think. I love receiving feedback and hit that subscribe button.


Take care,

Syndi